How to track macros with Cronometer
Cronometer is a nutrition tracking platform, accessible both as an app and through the web.
While MyFitnessPal has been the most popular choice for macro counting, Cronometer is emerging as a new favorite.
Using Cronometer for free
Cronometer is a free service. It’s actually very polite about upgrading to a gold subscription (you’re not tricked into subscribing — unlike some other services).
You’ll get access to all basic tracking. However, like all other trackers, a paid subscription provides extra features and eliminates ads.
If you’re serious about losing weight / gaining muscle, we strongly recommend upgrading to the paid version immediately. For two reasons:
- The ads can interrupt the process (as in all free tracker apps).
- You’ll be more likely to commit to the process and see results 😉
Two paid features of Cronometer that really stand out for macro counters:
- Nutrient oracle
You can find the best foods for specific nutrients (helpful for when you are running short of a macro) - Target Scheduler
Allows different macro targets for different days (very useful for those with workout macros and rest day macros).
Setting up Cronometer for successful macro tracking
All food-tracking apps are tricky to set up.
Set aside some time; don’t rush it. It’s worth it to get it right.
- Sign up at the website.
- Save your login details somewhere.
- If you’re on your phone, now you can download the app.
Tip: Upgrading to Gold subscription on the website gives a 10% discount (not available within app).
We recommend choosing how you will track exercise.
This is not a Cronometer thing but a macro-tracking thing! We’ve noticed to ways of doing things.
- BEGINNER: Don’t bother tracking exercise all the time. Assess your typical weekly exercise ahead of time.
- ADVANCED: You want to accurately track your day-to-day exercise (you use a fitness tracker etc).
Step 1: Calculate your macro targets
Use our calculator to get your macro targets.
If you chose beginner (don’t track exercise), then have an educated guess on your activity level. Choose Sedentary if you don’t regularly exercise. Choose Light Activity if you do regular workouts.
If you chose advanced (will track your exercise), then ONLY select Sedentary in our calculator (you’ll use Cronometer to add in extra energy from your exercise).
Why the two methods? 🤯
We’ve worked with thousands of macro counters. For those with predictable basic weekly exercise (or no exercise), it’s far easier to go the ‘beginner’ route.
For those with more advanced workouts that constantly change, tracking exercise will give the best results.
Here’s the output from our calculator:
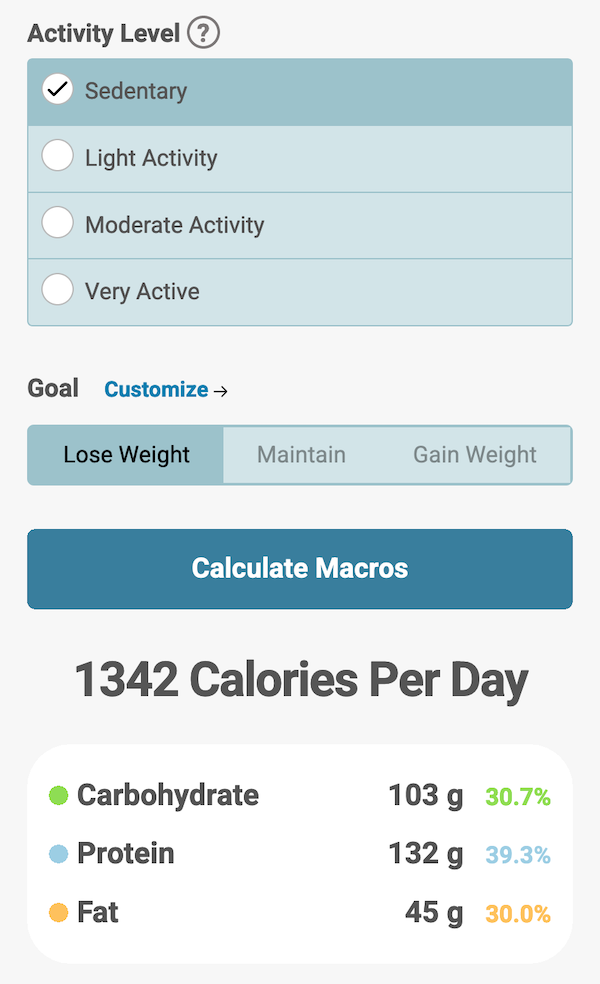
Write down (or screenshot) your numbers.
Step 2: Setup Cronometer
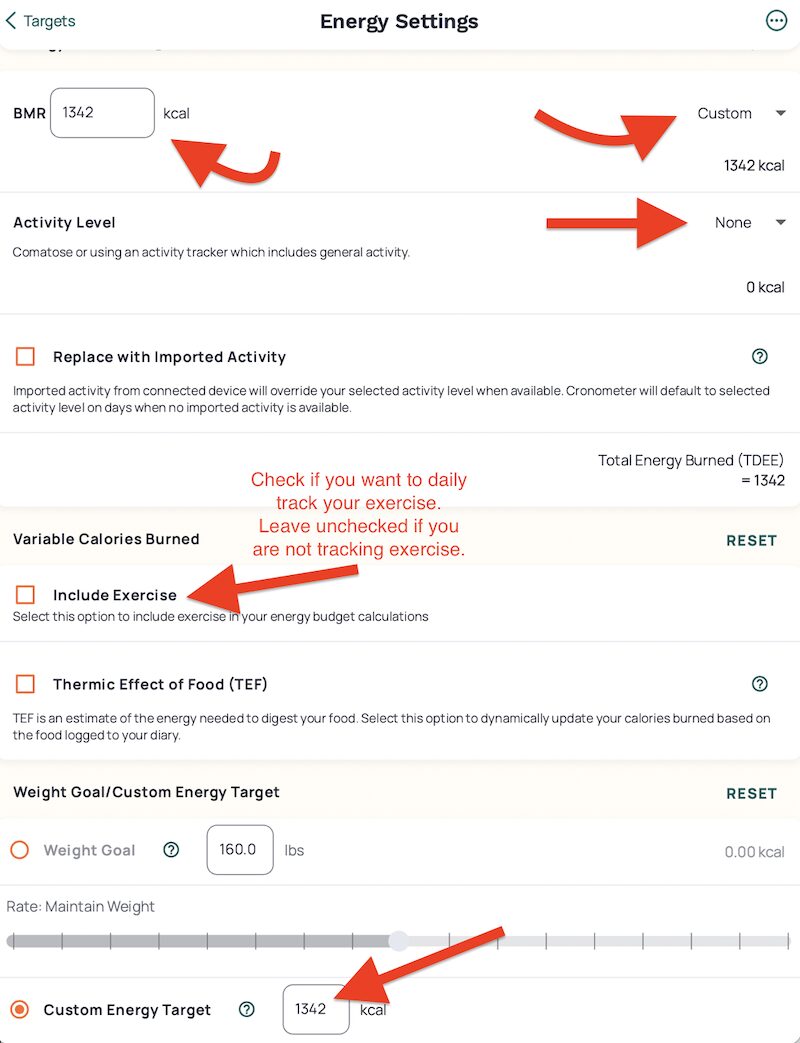
How to change your calorie goal on Cronometer.
You will reset all of Cronometer’s suggestions (and replace them with our calculator values).
- Click …More > Targets > Energy Settings
- Set Energy Burned to Custom, and enter the Calories per day from our calculator into BMR.
- Set Activity Level to None.
- Set Custom Energy Target to the Calories per day from our calculator.
- Only check Include Exercise if you chose to track exercise (what we call advanced).
Next, enter your macro targets.
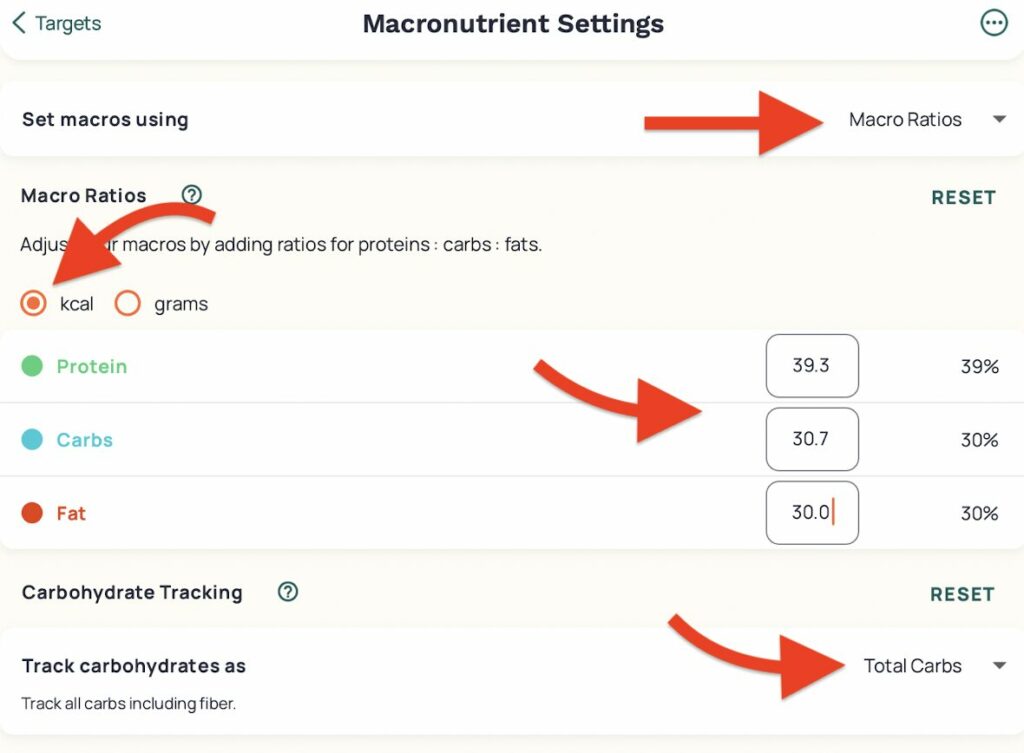
How to change macro amounts in Cronometer.
- Click …More > Targets > Macronutrient Settings
- Set macros using Macro Ratios
- Set your Macro Ratios to kcal, and enter the percentage targets our calculator gave you (make sure you get it right!).
- Track carbohydrates as Total Carbs (Net carbs are a bit more complex – see more).
Why choose percentages rather than grams?
Percentages are more helpful if you are tracking exercise, as it will adjust your daily targets as you do your exercise.
Step 3 – Start adding your meals
You can scan a barcode or manually enter your food.
Set up some of your regular meals. You can add a meal or a recipe to Cronometer. It’s helpful to have regular breakfasts and lunches—set these up, and tracking will be straightforward.
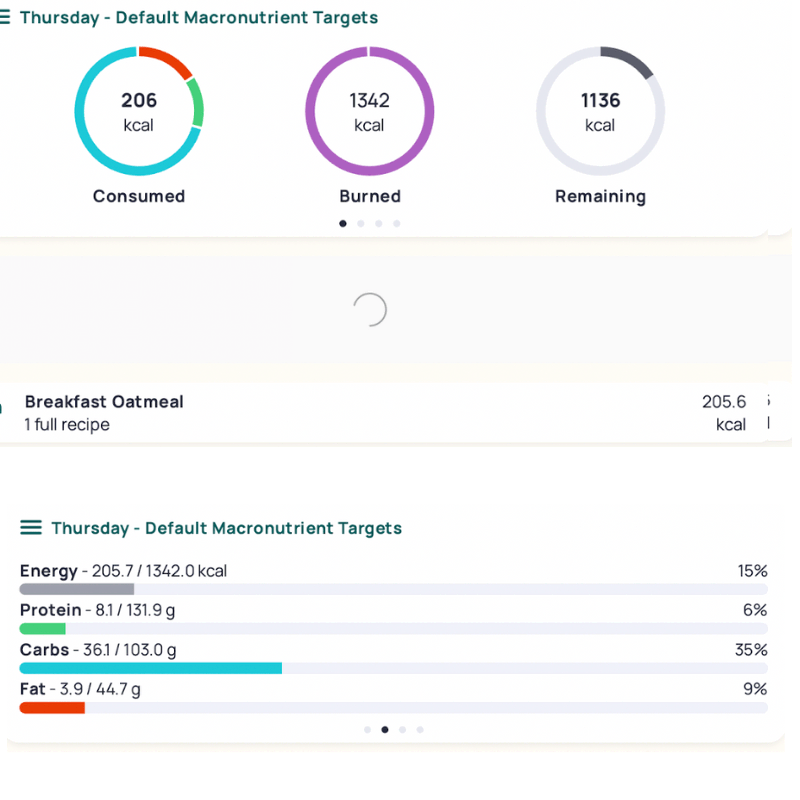
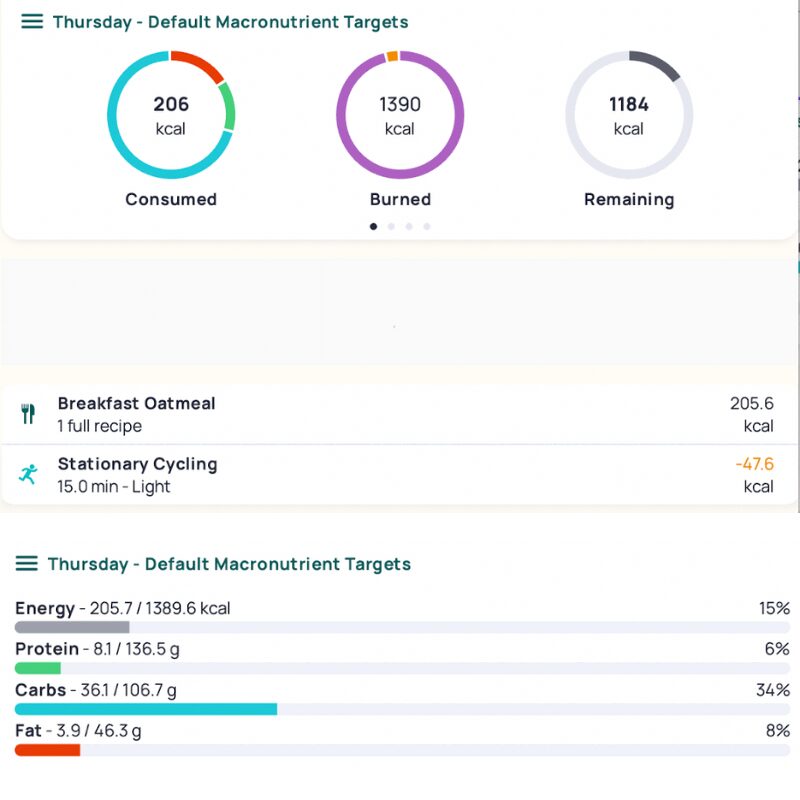
How do I see how I’m tracking on Cronometer?
Just tap on Diary.
Example Cronometer diary (when you’re not tracking exercise)
You can easily see how you are meeting your macro targets.
Example Cronometer diary (tracking exercise)
Notice how both daily calories AND macro amounts have changed? This is accounting for the extra energy coming from the Stationary Cycling.
This may seem weird. Why do you eat more when you exercise more? It’s a fundamental of the macro counting process.
Rather than starving yourself to lose weight, you also eat to fuel your workouts.
It works, as demonstrated by the thousands of successful clients we’ve worked with.
If you starve yourself AND exercise, you can’t exercise well, and you will not receive the metabolism boost.
Cronometer vs MyFitnessPal
Cronometer advantages over MyFitnessPal.
- Ability to set different macro targets for different days.
- Extensive nutrition reporting.
- Curated food database (smaller but with less crap in it).
- Cheaper yearly cost.
MyFitnessPal advantages over Cronometer
- Very large database (but has some flaky entries in it).
- Scan meal feature (uses AI to try and determine food).
- Limited macro tracking features.
- More expensive yearly cost.
MyFitnessPal has been the dominant tracker and has a massive user base. Cronometer has a smaller user base but is consistently rated very highly by users.
Which one to use? It’s a personal choice, but we recommend trying with Cronometer first.

I help people drop unwanted pounds without sacrificing their favorite meals or battling hunger.
Get nutrition assessment or explore 1-on-1 coaching.

 How to track macros with Cronometer
 What Are The Best Macros For Weight Loss?
 How To Count Macros on a Vegan, Vegetarian, or Plant-Based Diet
 Out of a Macro For the Day? Here’s What to Eat
 Macros for Gaining Muscle and Cutting Fat
Comments